
Reviewed · STIRLING CASTLE & THE KELPIES
Braveheart (Battle of Stirling Bridge) Tour
The most useful thing about this tour is that it takes you beyond the film version of Braveheart and puts you beside the actual site of Scotland’s 1297 victory. At Stirling Bridge, guide Steven explains how William Wallace and Andrew De Moray used the crossing against the English army, and he shows where the old wooden bridge may have stood.
I like the small group of no more than 15 and the short format, which leaves room for questions without eating half your day. I also like the use of a tablet and a model of the original bridge to make a vanished battlefield easier to picture. The main drawback is that this is an outdoor standing tour, with little walking but no shelter if Scottish weather turns rough.
In This Review
- Key points to know before you book
- Stirling Bridge beyond the Braveheart script
- What you see at the old bridge site
- Steven’s storytelling style and the personal touch
- Why the short format works
- Is $34.45 a fair price?
- What the tour can and cannot show you
- Who will enjoy this experience most?
- Planning your visit around the meeting point
- My verdict on the Braveheart tour
- FAQ
- How long does the Battle of Stirling Bridge tour last?
- Where does the tour meet?
- Where does the tour end?
- How many people can join the tour?
- Is the tour available in English?
- What happens if bad weather cancels the tour?
Key points to know before you book
- The real Stirling Bridge: See the area linked to the 1297 battle and the old wooden bridge that collapsed during the fighting.
- Wallace and Andrew De Moray: Learn about both leaders, not just the figure made famous by cinema.
- A guide-led reconstruction: Steven uses visual material and competing theories to explain a site with few visible remains.
- Short and personal: The tour lasts about 1 hour to 1 hour 15 minutes and is capped at 15 people.
- Outdoor conditions matter: You will not walk far, but you will stand outside, and poor weather can lead to a rescheduled tour or refund.
- Good value for history fans: At $34.45 per person, the price pays for interpretation of a site you could otherwise pass without understanding.
Stirling Bridge beyond the Braveheart script
The Battle of Stirling Bridge was Scotland’s first major victory in the Wars of Independence, fought in 1297. The bridge mattered because it narrowed the route across the River Forth. A large army could not simply spread out and charge. It had to cross in limited numbers.
That basic fact gives the tour its focus. You are not being led around a museum filled with objects. You are standing near a modern river crossing and trying to picture a wooden bridge, medieval armies, shifting tactics, and a battle that helped push Wallace and De Moray into the center of Scottish history.
I like this setting because it demands some imagination. There is no grand battlefield visitor center at the meeting point and no intact medieval bridge waiting for a photograph. The guide’s job is to connect the ground under your feet with what happened there.
The film Braveheart supplies a familiar doorway into the subject, but it also muddles plenty of facts. This tour is aimed at sorting out those inventions. You hear about Wallace and De Moray from their early days through the events that made them national figures, then on to their deaths and later legacy.
That broader story is important. William Wallace is the name most people know, but Andrew De Moray was a major partner in the 1297 campaign. Giving both men proper attention makes the battle easier to understand and keeps the tour from becoming a one-character movie recap.
More Stirling Castle and Kelpies trips:
- From Edinburgh: Loch Lomond, Stirling Castle & Kelpies Tour
★ 4.6 · 2,360 reviews - Loch Lomond, Kelpies & Stirling Castle Tour Including Admission
★ 4.5 · 1,305 reviews - Edinburgh: Loch Lomond, Stirling Castle and the Kelpies Day Tour
★ 4.5 · 1,198 reviews
What you see at the old bridge site
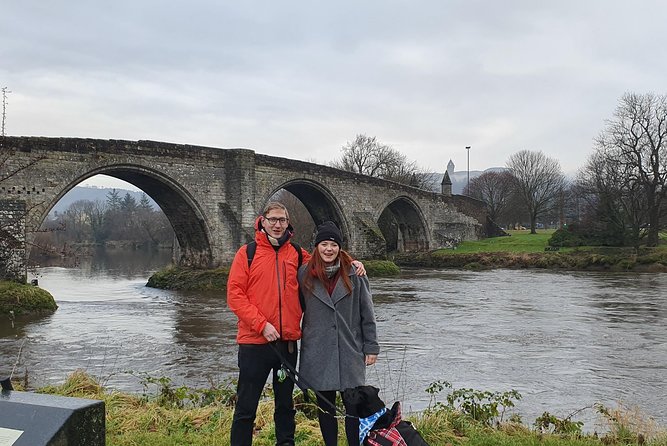
The meeting point is by Stirling’s Old Bridge, at or near Laurencecroft Road, just steps from the bridge. The activity begins and ends at this same point, so you do not need to arrange a second pickup or wonder where your vehicle will collect you.
The central sight is not a surviving section of the 1297 bridge. Instead, you can view the location where the old wooden crossing is thought to have stood and learn how it collapsed during the battle. That distinction matters. If you arrive expecting medieval masonry or a clearly marked battle line, you may feel underwhelmed at first.
The bridge that exists today is not the wooden bridge used in 1297. Modern flood defenses have also changed the setting. A guide is therefore more useful here than at a site with obvious ruins. Steven has used a tablet to show possible details of the original crossing, and he has even helped build a model of it with his father.
I find that kind of reconstruction more valuable than a quick photo stop. You can compare the present river crossing with a proposed older layout and ask how troops might have moved. The guide also discusses alternate theories about the old bridge’s position, rather than presenting an uncertain detail as settled fact.
That approach gives you a more honest visit. Medieval battle sites often contain fewer physical clues than popular films suggest. Here, the story and the geography do most of the work.
Steven’s storytelling style and the personal touch
Steven is the named guide associated with this experience, and his presentation is strongly centered on welcome, local pride, and enthusiasm for Scottish history. He is also described as going out of his way to answer questions, so you should feel free to ask about the battle, the bridge, Wallace, De Moray, or the difference between film and fact.
The small group size helps. With a maximum of 15 people, you are not likely to be lost in a large crowd around the guide. The format also suits a question-led conversation. If you already know the broad story, you can use the time to test details and competing explanations.
The host’s personality is part of the experience. References to Molly, Oatly, and Steven’s father appear in the tour’s warm welcome, and the guide often treats the visit as a personal introduction to Stirling rather than a scripted lecture. That will appeal to you if you enjoy guides who bring feeling and local character to historical subjects.
It may be less suitable if you want a silent, formal, museum-style explanation. The tone is friendly and personal. You are getting a host with strong enthusiasm for the subject, not an audio guide that lets you move at your own pace.
Some past bookings have also been arranged alongside a Bannockburn tour. If you plan to see both battle sites, it may be worth asking about combining them, though this Stirling Bridge experience itself remains a short, separate outdoor tour.
Why the short format works
The stated duration is about one hour to one hour and 15 minutes. I see that as a strength for most itineraries. You can fit it around Stirling Castle, the city center, a meal, or a wider day trip without giving up an entire afternoon.
A short tour also keeps the topic focused. The battle, the bridge, the main figures, and the long-term legacy all fit into a compact visit. You get enough context to understand the site, but you are not committing to a full-day military history program.
The tradeoff is depth. If you want a long battlefield walk, detailed troop movements, or an extended study of the Wars of Independence, this may feel brief. The itinerary centers on Stirling Bridge rather than a broad tour of every Wallace-related site in the area.
You should also expect some standing. One useful detail from the experience is that there is not a lot of walking, but you will be on your feet for a while. That makes it easier than a long countryside walk, but it is not a seated indoor presentation.
Wear shoes that are comfortable for an outdoor meeting point and bring protection from rain or cold. The tour requires good weather, so conditions can affect the schedule. If poor weather cancels the activity, you are offered another date or a full refund.
Same city, a completely different sort of day:
- Edinburgh: Loch Ness, Glencoe & the Scottish Highlands Tour
★ 4.6 · 17,446 reviews - Edinburgh: Harry Potter Magical Guided Walking Tour
★ 4.8 · 11,944 reviews - Edinburgh: Underground Vaults Tour
★ 4.6 · 11,758 reviews - Edinburgh Castle: Guided Walking Tour with Entry Ticket
★ 4.7 · 11,699 reviews
Is $34.45 a fair price?
At $34.45 per person, this is not the cheapest way to spend an hour in Stirling, especially since admission to the bridge area itself is free. You can walk to the river on your own without paying for entry.
The price is for interpretation. Without a guide, you see a bridge, a river, and a modern setting with limited visible evidence of the 1297 crossing. With Steven, you get the battle narrative, the role of Wallace and De Moray, visual aids, explanations of the old bridge’s possible location, and a correction to the familiar Braveheart version.
That makes the cost reasonable if you have a real interest in Scottish history or if this is your main reason for visiting Stirling Bridge. I would be less quick to recommend it if you only want a general sightseeing walk or a quick photograph by the river.
The group limit improves the value. A large coach tour can make a short history stop feel rushed and impersonal. A maximum of 15 people gives the guide a better chance to respond to your questions and adjust the explanation to the group’s interest.
There is also a practical value in the time. You are buying a focused hour rather than a long block of the day. For a couple or family already exploring Stirling, that can be a sensible addition.
What the tour can and cannot show you
You can expect a clear explanation of where the old wooden bridge was located, or where it may have been located according to different theories. You can also learn about its collapse during the battle and why the crossing shaped the fighting.
You should not expect to see the original bridge. There is no real trace of it now. The modern setting and flood defenses mean that the experience relies on explanation, maps, images, and the guide’s reconstruction.
That is not a flaw, but it is important to know before booking. Some historic places give you stones, walls, and ruins that speak for themselves. Stirling Bridge gives you a strategic location with a story that must be rebuilt in your mind.
The tour’s strongest moments are likely to come when Steven links the physical site to the battle plan. The bridge was not just a backdrop. It was the key feature that helped Scotland’s smaller force meet the English army on more favorable terms.
The emphasis on alternate theories is another plus for serious history fans. Instead of flattening the past into one tidy story, the guide acknowledges uncertainty. You can enjoy the drama without pretending every detail is proven.
Who will enjoy this experience most?
I would choose this tour if you like Scottish history, military history, or the gap between film and fact. It is especially useful if Braveheart sparked your interest but you now want a more accurate account of Wallace and the 1297 battle.
It also suits you if you prefer a local guide to a large commercial tour. Steven’s style is warm, direct, and personal, and the group cap supports conversation.
Families with older children may find the short length manageable, provided everyone can stand outdoors. The tour is also a good fit for people with limited interest in long walks, since the physical distance is modest.
You may want to skip it if you want extensive ruins, indoor shelter, or a major museum display. The attraction is the story of the place, not a collection of surviving battle remains.
Most people can take part, service animals are allowed, and the meeting point is near public transportation. The experience is offered in English and uses a mobile ticket.
Planning your visit around the meeting point
Check your confirmation carefully for the exact meeting instructions. The listed start area is Stirling Old Bridge by the River Forth, with Laurencecroft Road given as the meeting location. The tour returns to the same point.
Because the meeting spot is near the bridge, you can pair the tour with other time in Stirling. Allow enough time to arrive before the start, since the experience is short and a late arrival could mean missing a substantial part of it.
The tour is often booked well ahead, with an average booking time of 22 days in advance. You do not necessarily need to reserve that far ahead, but it is a useful warning for a fixed Scotland itinerary. The small capacity can fill before a busy travel date.
Free cancellation is available up to 24 hours before the start time for a full refund. Changes made inside that 24-hour window are not accepted, and late cancellations are not refunded. Since weather can affect the activity, keep an eye on local conditions and the operator’s communication.
One serious service failure has been acknowledged by the operator, involving a guide not appearing for a scheduled start. The response promised a refund and offered another date. This appears to be an isolated issue within otherwise very strong feedback, but I would still keep your confirmation handy and contact the operator promptly if the guide is not at the meeting point.
My verdict on the Braveheart tour
Book this tour if you want the real Stirling Bridge story, a personal guide, and a quick way to make sense of a site with few obvious remains. Steven’s enthusiasm, the focus on Wallace and Andrew De Moray, and the bridge reconstruction give the visit more substance than a self-guided walk.
I especially recommend it for visitors who want to correct the movie myths without losing the drama of the battle. At $34.45, the value depends on your interest: history fans should find the interpretation worth paying for, while casual sightseers may prefer to view the bridge freely.
Go prepared to stand outside, accept that the original bridge is gone, and let the guide supply the missing pieces. If that sounds appealing, this compact tour is a smart addition to a day in Stirling.
FAQ
How long does the Battle of Stirling Bridge tour last?
The tour lasts approximately 1 hour to 1 hour and 15 minutes.
Where does the tour meet?
The meeting point is by Stirling Old Bridge near the River Forth, with Laurencecroft Road listed as the meeting location. It is only steps from the old bridge.
Where does the tour end?
The activity ends back at the meeting point.
How many people can join the tour?
The tour has a maximum group size of 15 people.
Is the tour available in English?
Yes. The tour is offered in English and includes a mobile ticket.
What happens if bad weather cancels the tour?
This experience requires good weather. If it is canceled because of poor weather, you will be offered another date or a full refund.
Just added around Edinburgh
- the World Famous Kelpies and Stirling Castle small group tours★ 4.5 · 14 reviews
- Outlander Walking Tour of Edinburgh’s Old Town★ 4.5 · 14 reviews
- Edinburgh: Stirling Castle & Loch Lomond Private Luxury Day Tour★ 4.5 · 14 reviews
- Edinburgh: Hill & Nature Hike With a Local★ 5.0 · 14 reviews
- Edinburgh: Rosslyn Chapel and Hadrian’s Wall Tour in Spanish★ 4.5 · 14 reviews
- Private – Culloden, Clava Cairns Day Tour from Edinburgh★ 5.0 · 14 reviews
- Edinburgh: Stirling, Whisky & St Andrews Tour in Italian★ 3.9 · 14 reviews
- Private Edinburgh Castle Tour★ 4.5 · 14 reviews
Stirling Castle & the Kelpies, compared.
Loch Lomond, Kelpies & Stirling Castle Tour Including Admission
Read our review →
Loch Lomond, Stirling Castle and the Kelpies Day Tour
Read our review →
Rosslyn Chapel, Dunfermline Abbey and Stirling Castle Day Tour
Read our review →
Loch Lomond, Stirling Castle, & Kelpies Tour from Edinburgh
Read our review →Browse the lists this tour appears in